An FM Crystal Set
I was reading my favorite internet newsgroup the other day, and the discussion had turned to whether or not it was possible to make a crystal set capable of receiving FM stations. The opinions were varied. Some flatly stated that it was not possible. Others said it was possible, but the circuit was complex. Still others debated whether slope detection or ratio detection would or would not work, with proponents for each side. I do not have a lot of electronic experience, but it was all very interesting to me. It was especially interesting, given that I had seen a demonstration of a working FM crystal set made by my good friend Ed Garner. I have prevailed upon Ed to provide plans for building this crystal set, along with some limited explanation (limited mostly by my ability to understand it). Here is a list of required parts:
1 - Set of high impedence headphones (about 2000 ohms). Do not use crystal phones.
1 - Set of adjustable TV rabbit ears or a pair of metal tape measures.
1 - 1N34 diode
1 - 20 inch length of 3 inch diameter copper sewer pipe
1 - 20 inch length of 0.75 inch diameter copper water pipe
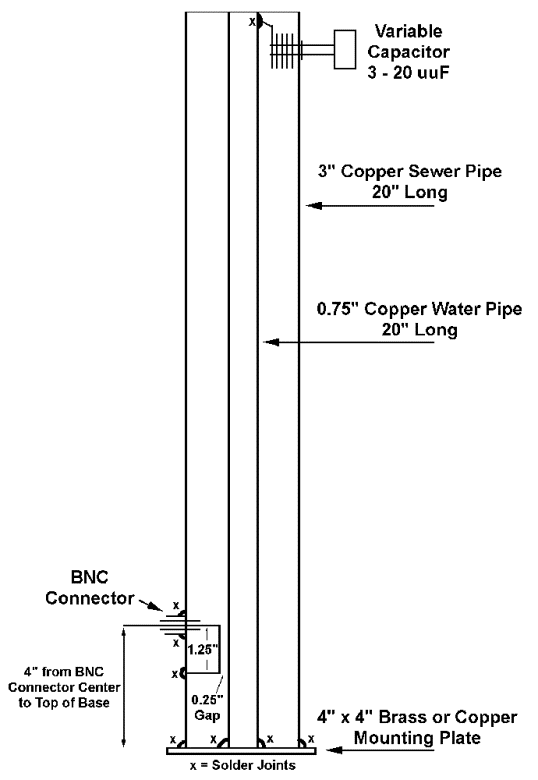
1 - 4 inch by 4 inch square of copper or brass
1 - Variable capacitor, 3 uuf to 20 uuf
2 - BNC coaxial connectors
1 - Coax T connector
1 - Small metal box for detector
1 - About a 6 inch length of solid bus wire
1 - Set of appropriate connectors for your phones
1 - 6 feet to 15 feet length of coaxial cable
* - Coaxial cable end piece connectors as required, or you could hardwire everything
* - Appropriate solder, soldering iron, and tools
MAIN ASSEMBLY
The main body of the set is a resonant cavity designed to be resonant close to the FM band. Most of the dimensions are fairly critical, and good solder joints are required! During assembly, refer to the diagrams that follow. To assemble the main body, first solder the 0.75 inch diameter tube to the center of the 4 inch by 4 inch base. Prepare the 3 inch diameter tube by adding the tuning capacitor very close to the top. Then add the BNC connector on the opposite side of the tube, with the center conductor 4 inches from the bottom. Drill a hole 1.25 inches below the center of the BNC connector just large enough to pass the bus wire. Make a stiff, flattened "U" with the bus wire from the BNC connector to this hole on the inside of the tube. The bottom edge of this "U" should be 0.25 inches from the inner (0.75 inch diameter) tube, when the cavity is assembled. It is best to test the fit several times before soldering. Once the 3 inch tube is prepared, it is centered around the 0.75 inch tube and soldered in place. Now solder a connection from the variable capacitor to the top of the 0.75 inch tube. Note that the tops of these tubes are left open. The main assembly is now complete.
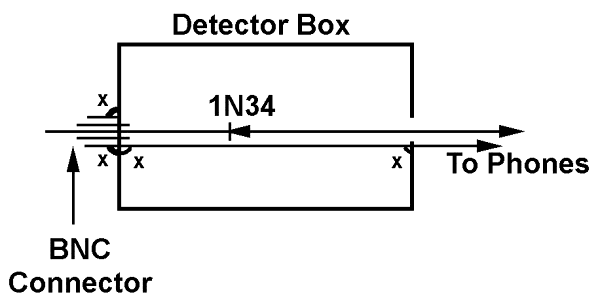
THE DETECTOR BOX
Assembly is straightforward as in the diagram. Drill a hole, and add a coaxial connector to one side of the box. Drill the appropriate hole(s) and add the phone plug on the other side. The outer part of the coaxial connector and one side of the phones are connected to the box. A 1N34 diode is soldered to the center of the connector and to the other phone connection.
PUTTING THE SYSTEM TOGETHER
Attach the "bottom leg" of the "T" connector to the BNC connector on the main tube. Connect the detector box to one side of the "T" using 13 +/- 1 inch of coaxial cable (This dimension is critical). Connect the TV rabbit ears to the other side of the "T" using 6 to 15 feet of coaxial cable (A 3 element yagi can be substituted for the rabbit ears). Plug in the phones on the other side of the detector box, and you are ready to try out the FM crystal set!
Note: the rabbit ears or tape meadures should point 180 dgrees from each other. It is advantageous to adjust them for the intended frequency (distances are from one end of the dipole to the other): 88 Mhz = 63 inches, 100 Mhz = 56 inches, 108 Mhz = 52 inches.